
 Save
Save
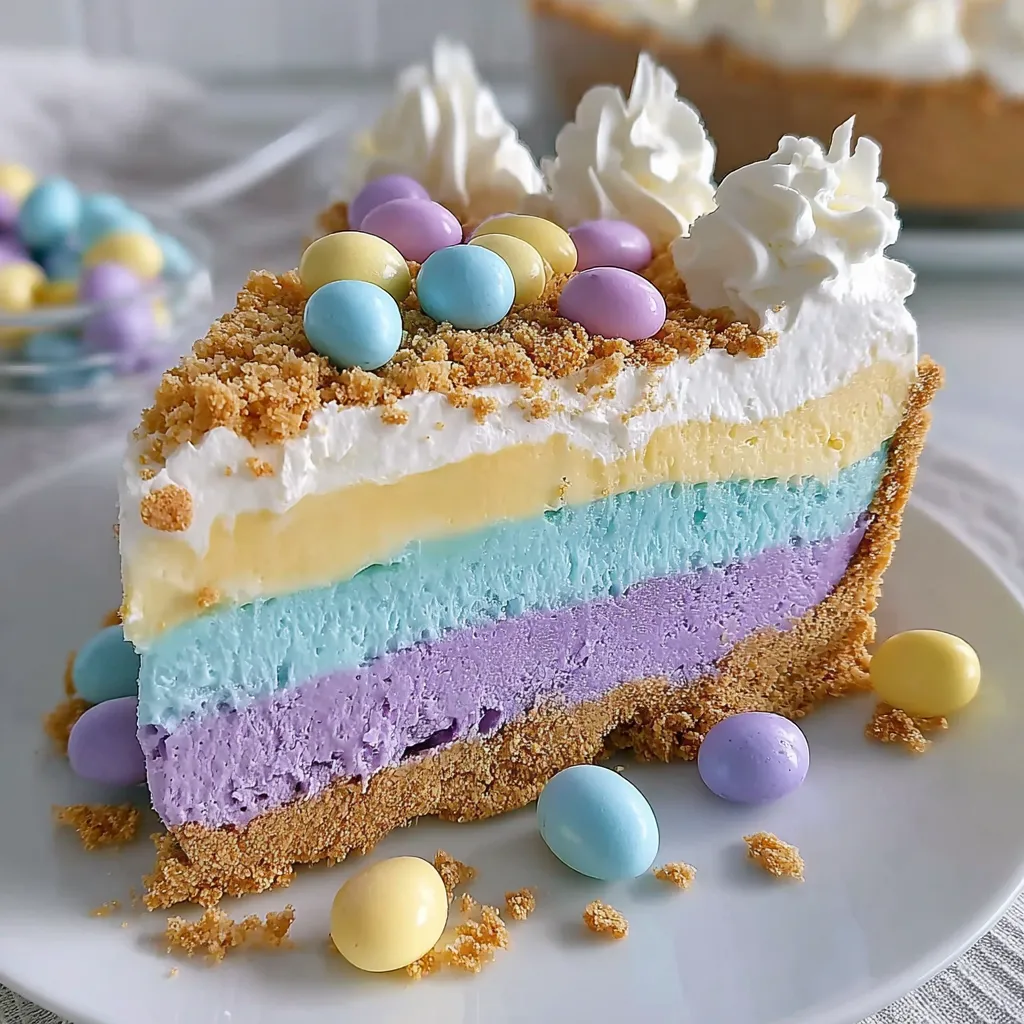
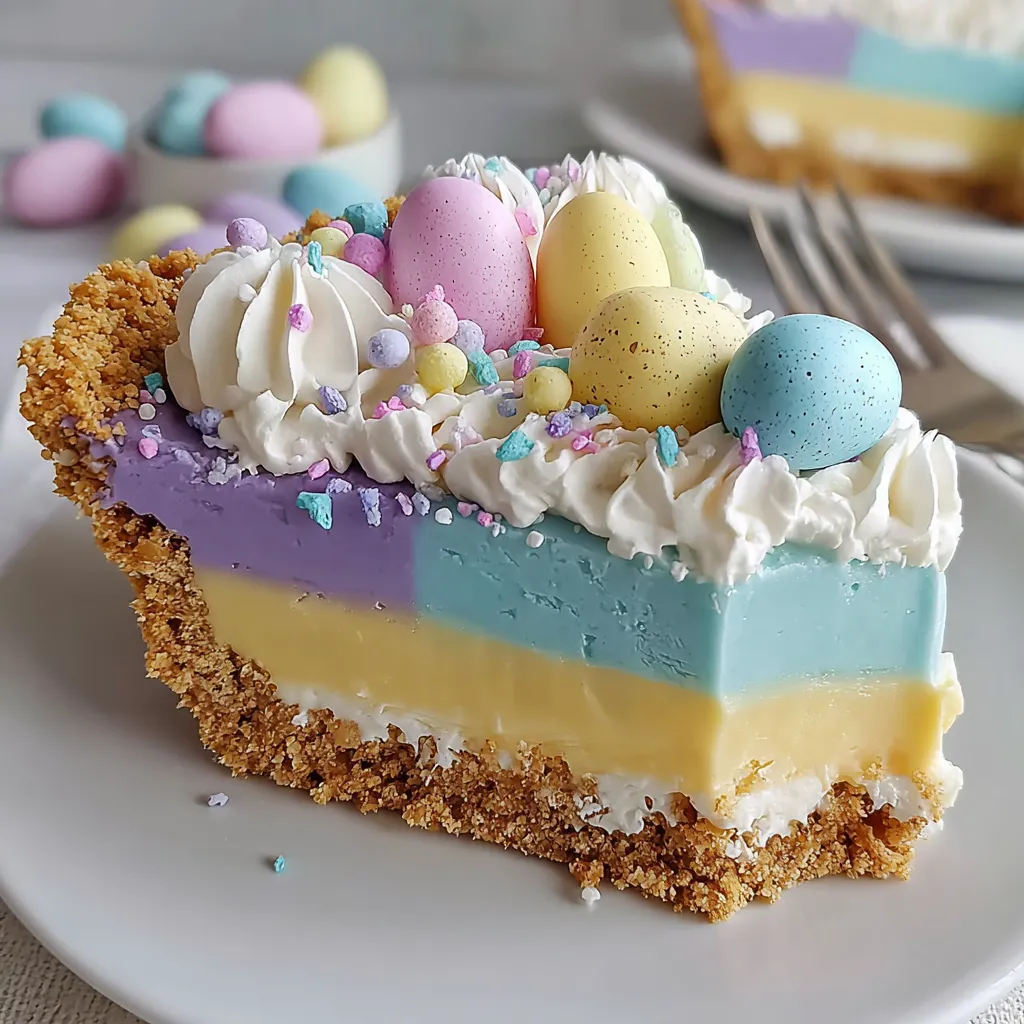
This vibrant Easter Jello-O Pie has become my springtime signature dessert. The colorful layers create a showstopping effect that delights both kids and adults at holiday gatherings while requiring minimal effort to prepare.
I first created this dessert when hosting my first Easter as a newlywed. My mother in law requested something light and festive and this pie became an instant tradition that everyone now expects each spring.
Ingredients
- Graham cracker crumbs create a sweet buttery foundation that perfectly complements the light Jello layers
- Butter binds the crust together use unsalted for better control of flavor
- Pink Starburst JellO brings a soft rosy hue consider adding food coloring for more vibrancy
- Blue JellO creates a stunning contrast layer look for berry blue for the most vivid color
- Yellow JellO adds a sunny springtime touch may need additional food coloring for brightness
- Purple JellO completes the Easter palette grape flavor works beautifully here
- Whipped cream lightens the texture and creates a mousse like consistency use real cream for best results
- Food coloring optional but recommended for achieving truly Easter worthy colors
Step-by-Step Instructions
- Prepare the Crust
- Melt butter completely until fully liquified. Combine with graham cracker crumbs until the mixture resembles wet sand with a uniform texture. Press firmly into springform pan creating an even layer on bottom and sides. The freezer step is crucial here as it helps the crust set quickly while you prepare the filling layers.
- Mix JellO Solutions
- Dissolve each JellO flavor in its own separate bowl with boiling water stirring continuously for at least 30 seconds. The hot water must be truly boiling to properly activate the gelatin. Add cold water to each bowl and stir again. The cold water stops the cooking process and begins the setting. Refrigerate until thickened but not solid about 20 minutes. Look for a consistency similar to maple syrup.
- Create Mousse Layers
- Fold whipped cream into each JellO mixture with vigorous stirring until completely incorporated. This process transforms the JellO from translucent to opaque creating a mousse like texture. The mixtures should be thick enough to hold their shape but still pourable. This is the point to add additional food coloring if desired especially for the naturally lighter yellow and pink flavors.
- Layer the Pie
- Pour the first color layer into the chilled crust and spread evenly to edges. The freezer intervals between layers are essential they prevent bleeding between colors and create those clean distinct layers. Work efficiently during the layering process to maintain ideal consistency of remaining mixtures.
- Set and Serve
- Allow pie to freeze completely for several hours. The freezing process ensures clean slices and proper setting of all layers. Let stand at room temperature for about 5 minutes before slicing for cleanest results. The contrast between the colorful layers creates a beautiful presentation when sliced.
The layering technique in this pie reminds me of the rainbow Jello salads my grandmother would make for church potlucks. She taught me that patience between layers creates the most beautiful results a lesson that applies to both desserts and life.
Storage Information
This Easter JellO pie should be stored covered in the refrigerator where it will maintain its best texture and flavor. The pie will stay fresh for up to 4 days though the graham cracker crust may soften slightly over time. For the best presentation serve within the first 48 hours when colors remain most vibrant and the textural contrast between crust and filling is at its peak.
Creative Variations
While this recipe features classic Easter pastels you can easily adapt the color scheme for other holidays or occasions. Try red and blue layers for Fourth of July green and red for Christmas or school colors for graduation parties. The flavor combinations are equally customizable substitute lemon lime JellO for yellow or berry blue for a more tropical theme. The versatility of this base recipe makes it perfect for customizing to your particular celebration.
Serving Suggestions
This Easter JellO pie stands beautifully on its own but can be elevated with thoughtful garnishes. Consider a dollop of additional whipped cream on each slice topped with pastel sprinkles or small chocolate eggs. For a more sophisticated presentation add edible flowers like pansies or violets around the base of the pie. Serve chilled on colorful spring plates alongside a cup of coffee or tea for a delightful dessert experience.
The Science Behind JellO Setting
The transformation from liquid to solid in this recipe happens through a fascinating process. Gelatin proteins in the JellO unwind when heated then form a matrix that traps water as they cool creating that distinctive wobbly texture. The addition of whipped cream introduces air bubbles and fat which interfere with this matrix resulting in a softer mousse like consistency rather than the firm wiggle of traditional JellO. The freezing step accelerates setting while creating a firmer texture perfect for clean slicing.
Recipe FAQs
- → Can I use different Jello flavors for this dessert?
Yes! Feel free to customize the flavors to your preference. Just ensure you maintain the same measurements (approximately 1.5 oz per color) and follow the same preparation method for each layer. Consider how your chosen flavors will complement each other.
- → Why do I need to freeze between adding layers?
The brief freezing between layers (about 5 minutes each) helps set each color slightly before adding the next. This prevents the colors from mixing together and ensures you achieve distinct, clean layers for that beautiful visual effect when sliced.
- → Can I make this dessert ahead of time?
Yes, this is an excellent make-ahead dessert. It needs 3-4 hours to set completely and can be stored in the refrigerator for up to 4 days. Just cover it well to prevent it from absorbing other flavors in your refrigerator.
- → Why doesn't this dessert freeze well?
Gelatin desserts change in texture and consistency when frozen and thawed. The freezing process can cause the gelatin molecules to break down, resulting in a weepy, separated texture once thawed. It's best to store this dessert in the refrigerator instead.
- → How can I make the colors more vibrant?
As noted in the instructions, the yellow and pink Jello layers tend to be lighter in color. You can add a few drops of food coloring to intensify these colors. Add the food dye when mixing the Jello with whipped cream and stir until you achieve your desired shade with no streaking.
- → Can I use a regular pie dish instead of a springform pan?
While a springform pan is ideal for easy removal and serving, you can use a deep pie dish instead. Keep in mind that removing the first slice might be a bit messier, and you won't be able to achieve the same height with the crust up the sides.